Network preparation
When deploying the server inside a corporate network behind NAT and a firewall, you need to configure the server as described below.
Tab “Network interface parameters”
On this tab, after the first start and login to the web interface, you must enter the settings that were specified through the command line during server installation, add the DNS server address and save the settings.
When using two or more network interfaces, it is recommended to use the first interface eth0 for access to the server from the external network, and the second interface for local network clients. Routing for requests from local clients to the external network and back is configured on the “Routes” tab. When an interface is added, you must restart the server after saving the settings. After the restart, the second interface should have the status “Up”.
NAT tab
On this tab, enter the external IP address of the server in the “External IP” field, and check the required protocols for operation through NAT – H.323 and/or SIP. Specify local networks as shown in the example on the page, one per line. Set the RTP port range (default 20000–65000). Save the settings.
Preparing the server and clients
For a quick start, you need to configure the “Main” tab, the “Anonymous connection” tab, and create test Accounts.
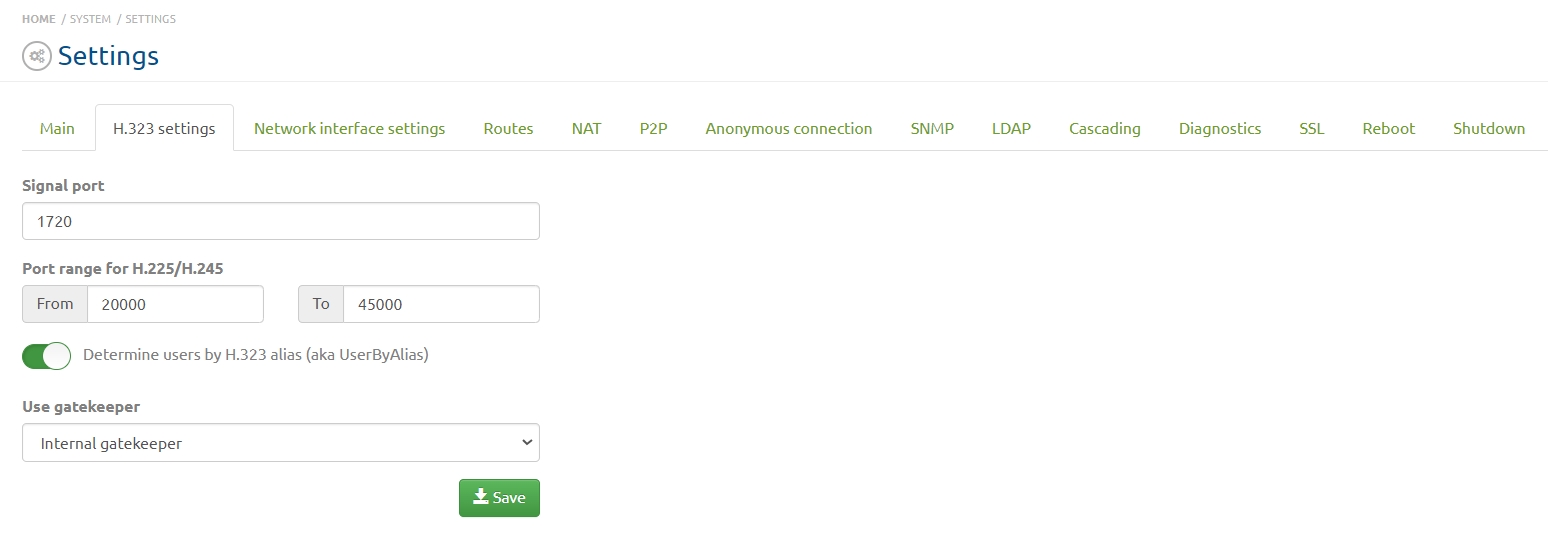
- To work with registered H.323 accounts, go to “Settings” => “H.323” tab and enable the server’s “Internal gatekeeper”.
- Be sure to check the date and time.
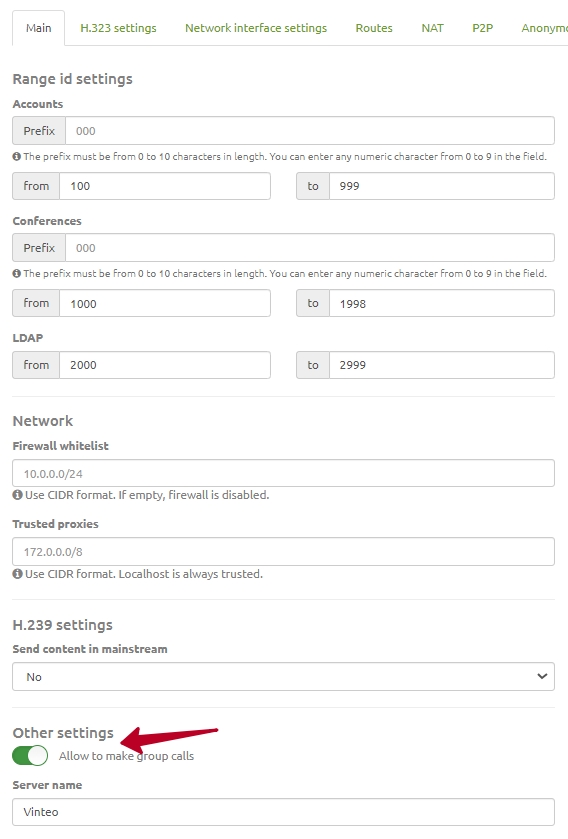
- In the “Other settings” section (located on the “Main” tab), enable the “Allow to make group calls” parameter. It allows any authorized WS-type account to convert point-to-point calls into multipoint conferences and also to initiate “Group calls”.
- Save the settings.
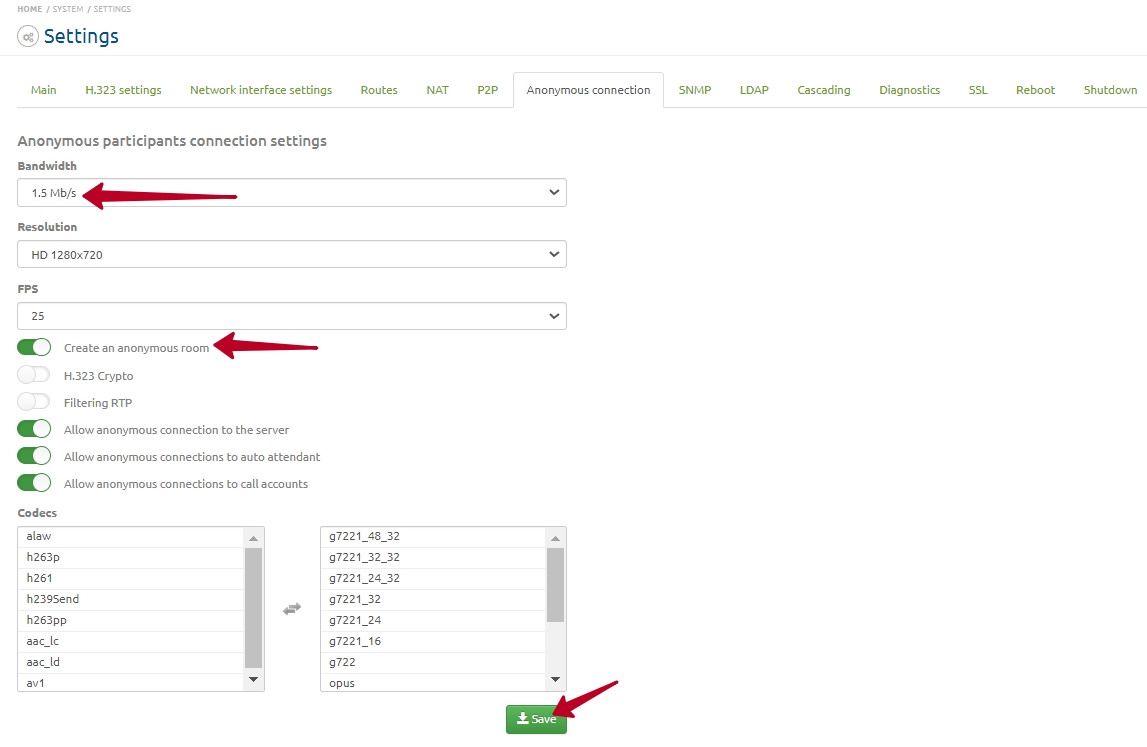
- Go to the “Anonymous connection” tab, set the bandwidth for HD to 1.5 Mbit/s, for FHD to 2.5 Mbit/s, enable the “Create an anonymous room” option, adjust the remaining parameters as desired and save the settings. This option allows accounts, having previously agreed on the date/time/conference number, to independently start and conduct videoconferences without any moderation or web streaming. Anonymous conferences are not displayed in the general list on the “Conferences” page, but only in the “Anonymous conferences” indicator on the main page, where you can forcibly terminate them. After testing, you can disable this option if it is not required for further work.
- Make sure that the list of allowed codecs (right column) is empty by default — this means all codecs from the left column are allowed.
- Save the settings.
Codec order in lists
The correct order of codecs is important for stable server operation with a wide range of endpoint models, both in the anonymous settings and in subscriber profiles. First come audio codecs from “best” to “worst”, then video codecs in the same order. For anonymous users connecting via Vinteo Desktop, web client and Vinteo mobile application without authorization on the server, the anonymous codec list must contain the Opus audio codec and the H.264 and VP8 video codecs. Below are examples of universal codec lists with a recommended order:
- For anonymous users:
– aac_ld
– opus
– g7221_48_32
– g7221_32_32
– g7221_24_32
– g7221_32
– g7221_24
– g7221_16
– g722
– ulaw
– h264
– h263pp
– h263p
– h263
– h261
– vp8
- For codecs in subscriber profiles:
– aac_ld
– opus
– g7221
– g722
– ulaw
– h264
– h263pp
– h263p
– h263
– h261
Creating Accounts on the server
To create accounts, go from the “Home” page to “Accounts” => “List”. In the window that opens, use the buttons to create a single account or a group of accounts. This section provides a short algorithm for creating two accounts of types WS and H.323 via individual settings. A more detailed description is available by following the relevant link in the interface. To add a new account, click “Add new account”. In the modal window configure the following:
- Select “Type” – “WS”;
- optionally change the account number (which is also used as the authentication name). The number is created automatically with an increment of +1;
- enter the account’s name/nickname;
- change the generated password, if required, or generate a new one;
- enter the account’s email; their authentication data and settings will be emailed after saving;
- set the maximum resolution of the account when connecting;
- set the maximum channel bandwidth;
- set the maximum resolution for point-to-point connections;
- save the account.
Create the next participants of types H.323 and SIP in the same way. The default codec set is usually suitable for most modern endpoints. For Polycom VSX6000 endpoints you should add h263p and h263 after the H.264 codec. The “Main settings” for SIP and H.323 accounts are identical to WS; differences start on the “Advanced” tab.
Working with conferences and accounts
Creating a test conference
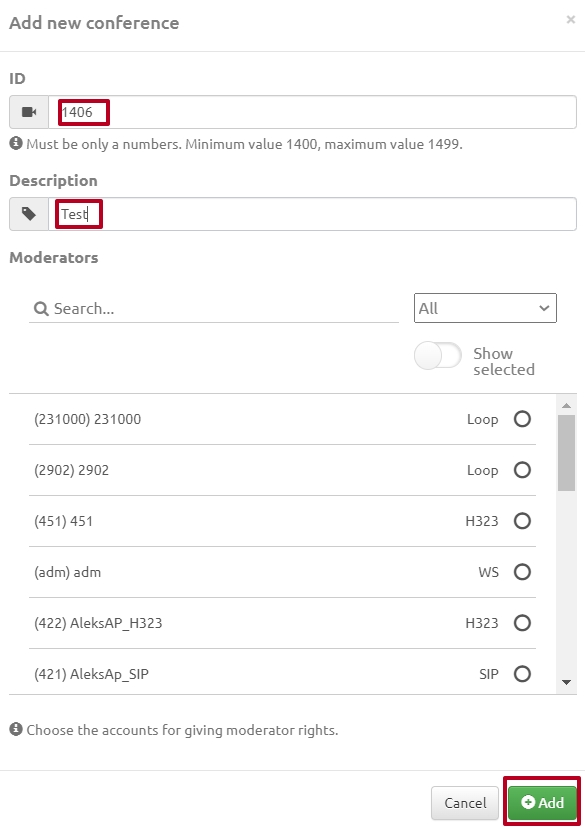
On the “Conferences” page click “Add new conference”.

In the dialog for creating a new conference, enter “1000” in the “Number” field and “Test” in the “Description” field. Click “Add”.
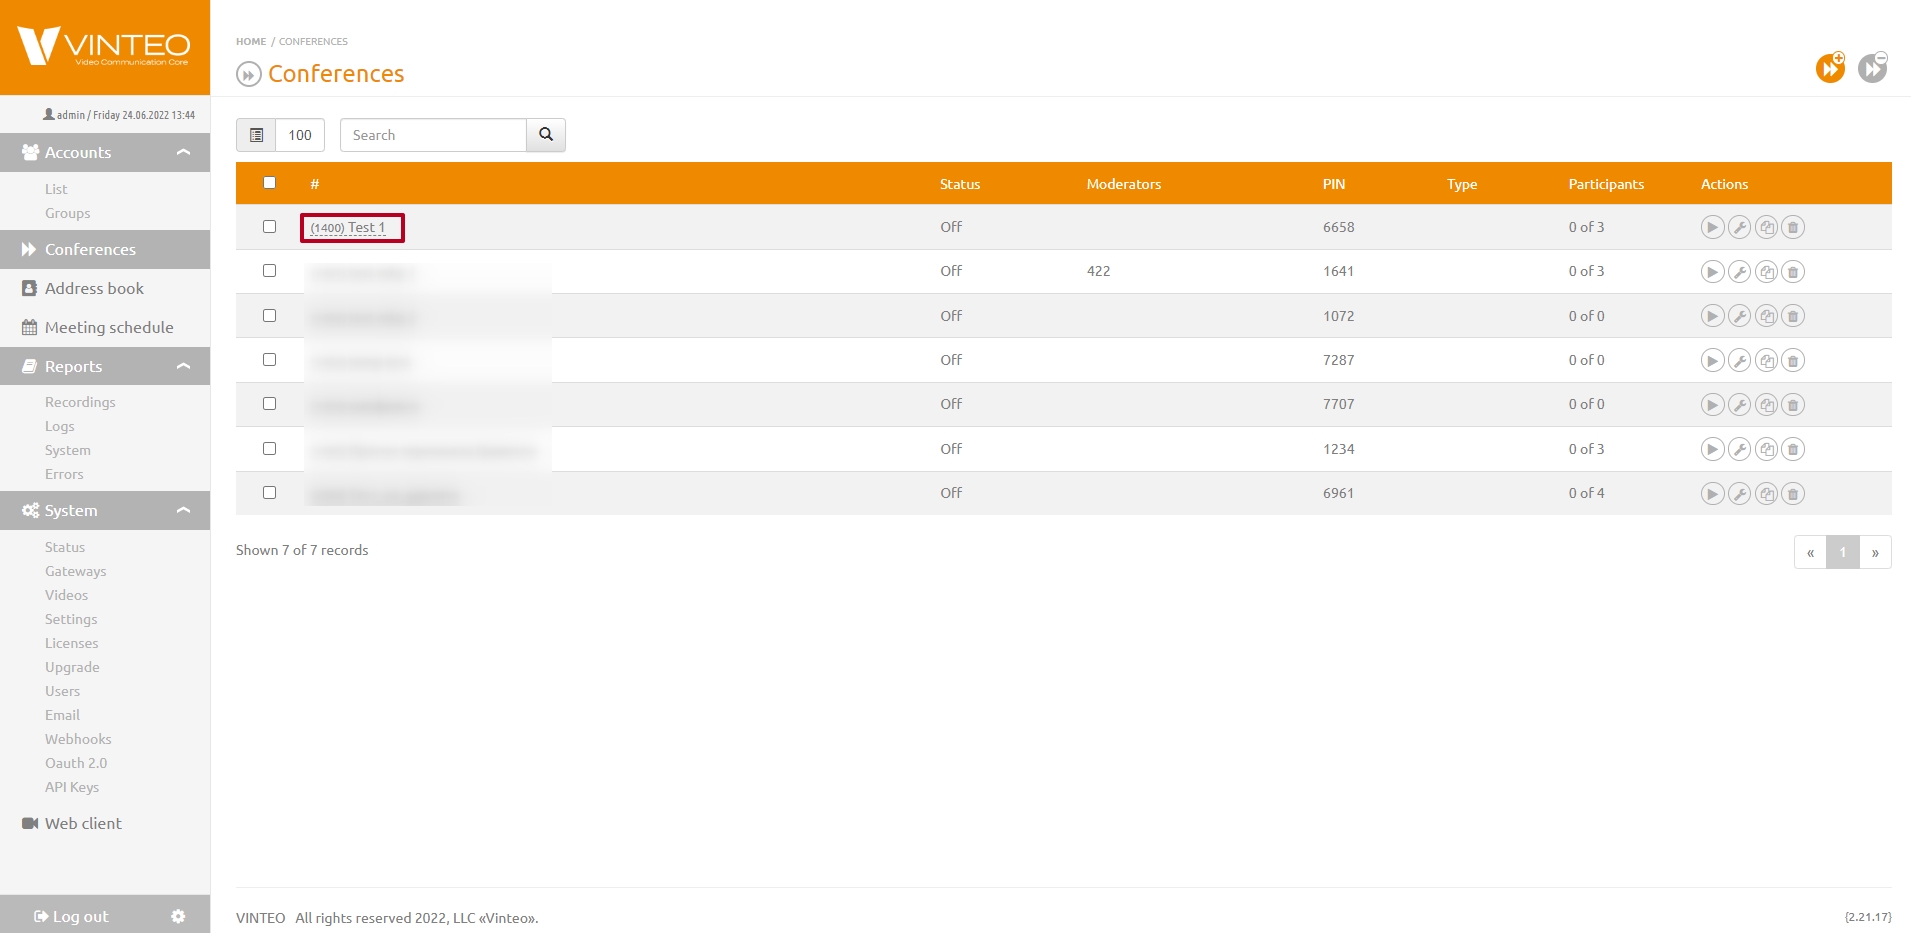
Open the conference settings by clicking the row “(1000) Test” in the conference list.
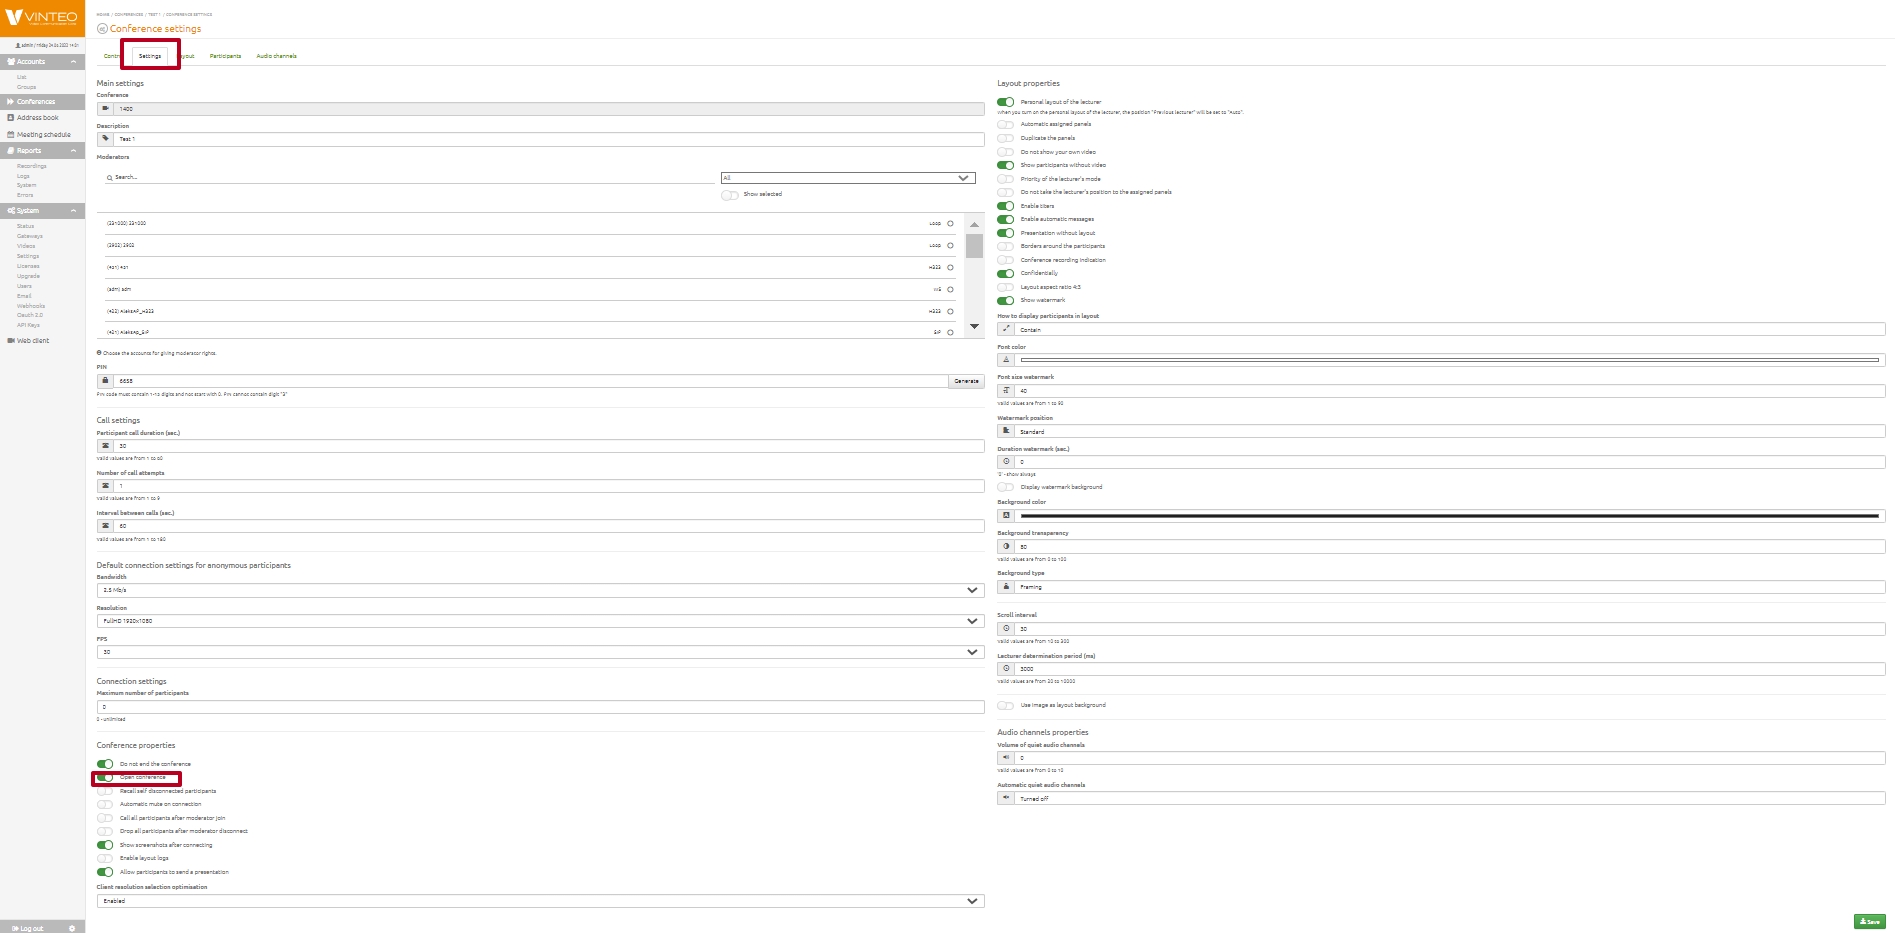
In the conference settings, on the “Settings” tab, in the “Connection settings” section, enable the “Open conference” option and click “Save”.
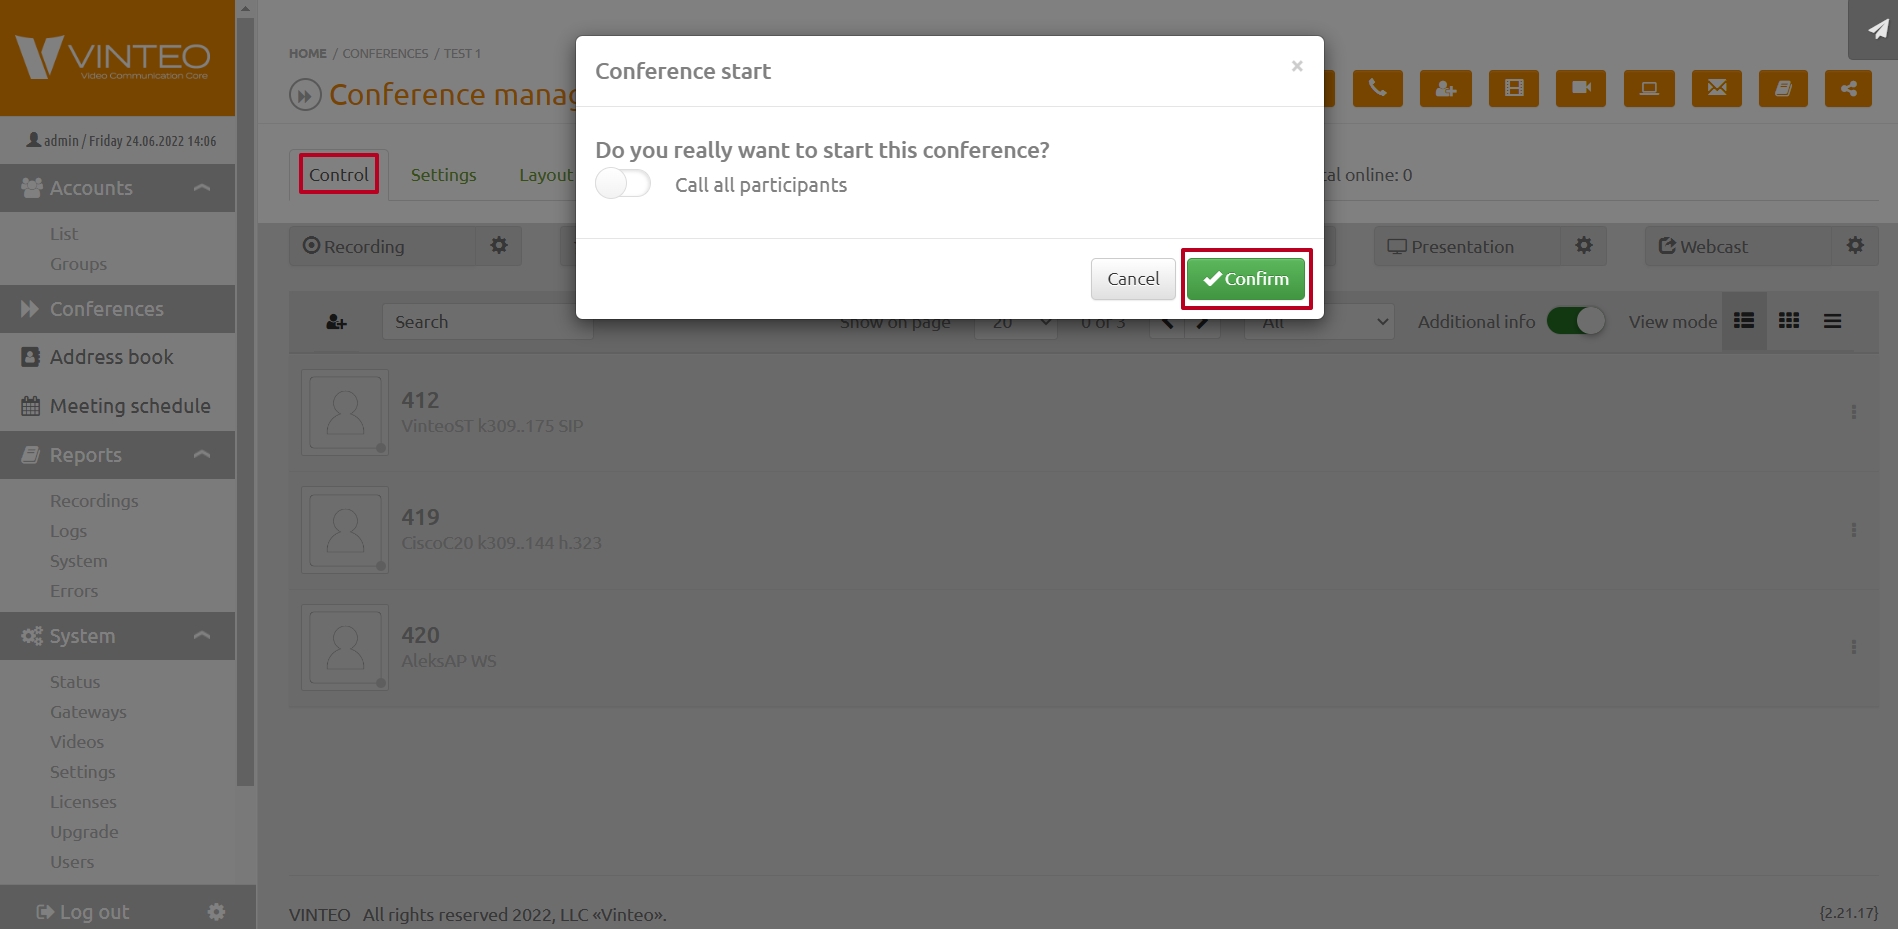
To start the conference, go to the “Control” tab and click the “Stopped” button. In the confirmation dialog, click “Confirm”.
Enabling web streaming
To test the “Web streaming” feature, perform the following steps:
- Open the web streaming settings from the “Conference control” page;
- Copy the “Temporary streaming link” to the clipboard;
- Save the settings if you have made changes;
- Enable the stream — the button color will change;
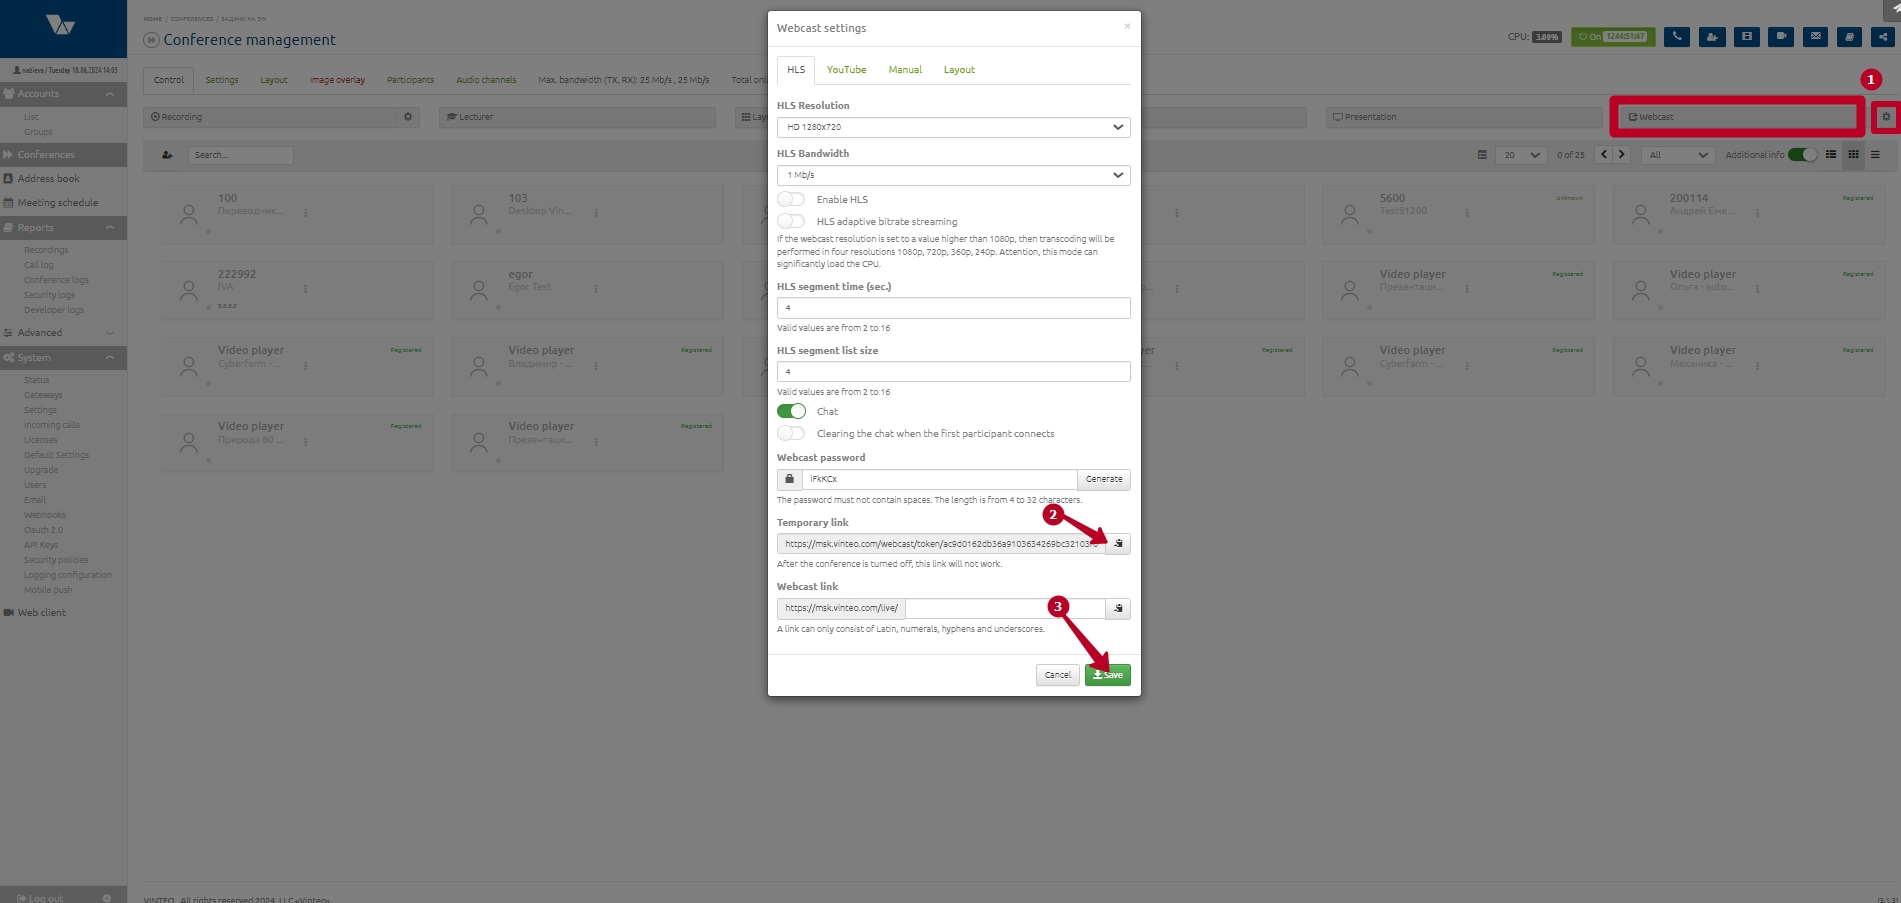
- Paste the copied link into your browser’s address bar and open it;
- Click on the video area or press the play icon to start playback.
You will see the conference stream; the main playback controls are displayed at the bottom of the window.
Connecting accounts
Vinteo Desktop account
To call an open conference with number “1000”, an authorized Vinteo Desktop client just needs to dial this number. The client can also call any authorized account in a point-to-point call by dialing, for example, number “101” assigned to a Polycom RPD account of type H.323.
Polycom RealPresence Mobile account
An authorized Polycom RPD account also just needs to dial the number of the created conference or the Vinteo Desktop account (100) and place the call.
Calling accounts from a conference
To call registered accounts from the server, open the created conference via “Home” => “Conferences” => row “(1000) Test” in the list.
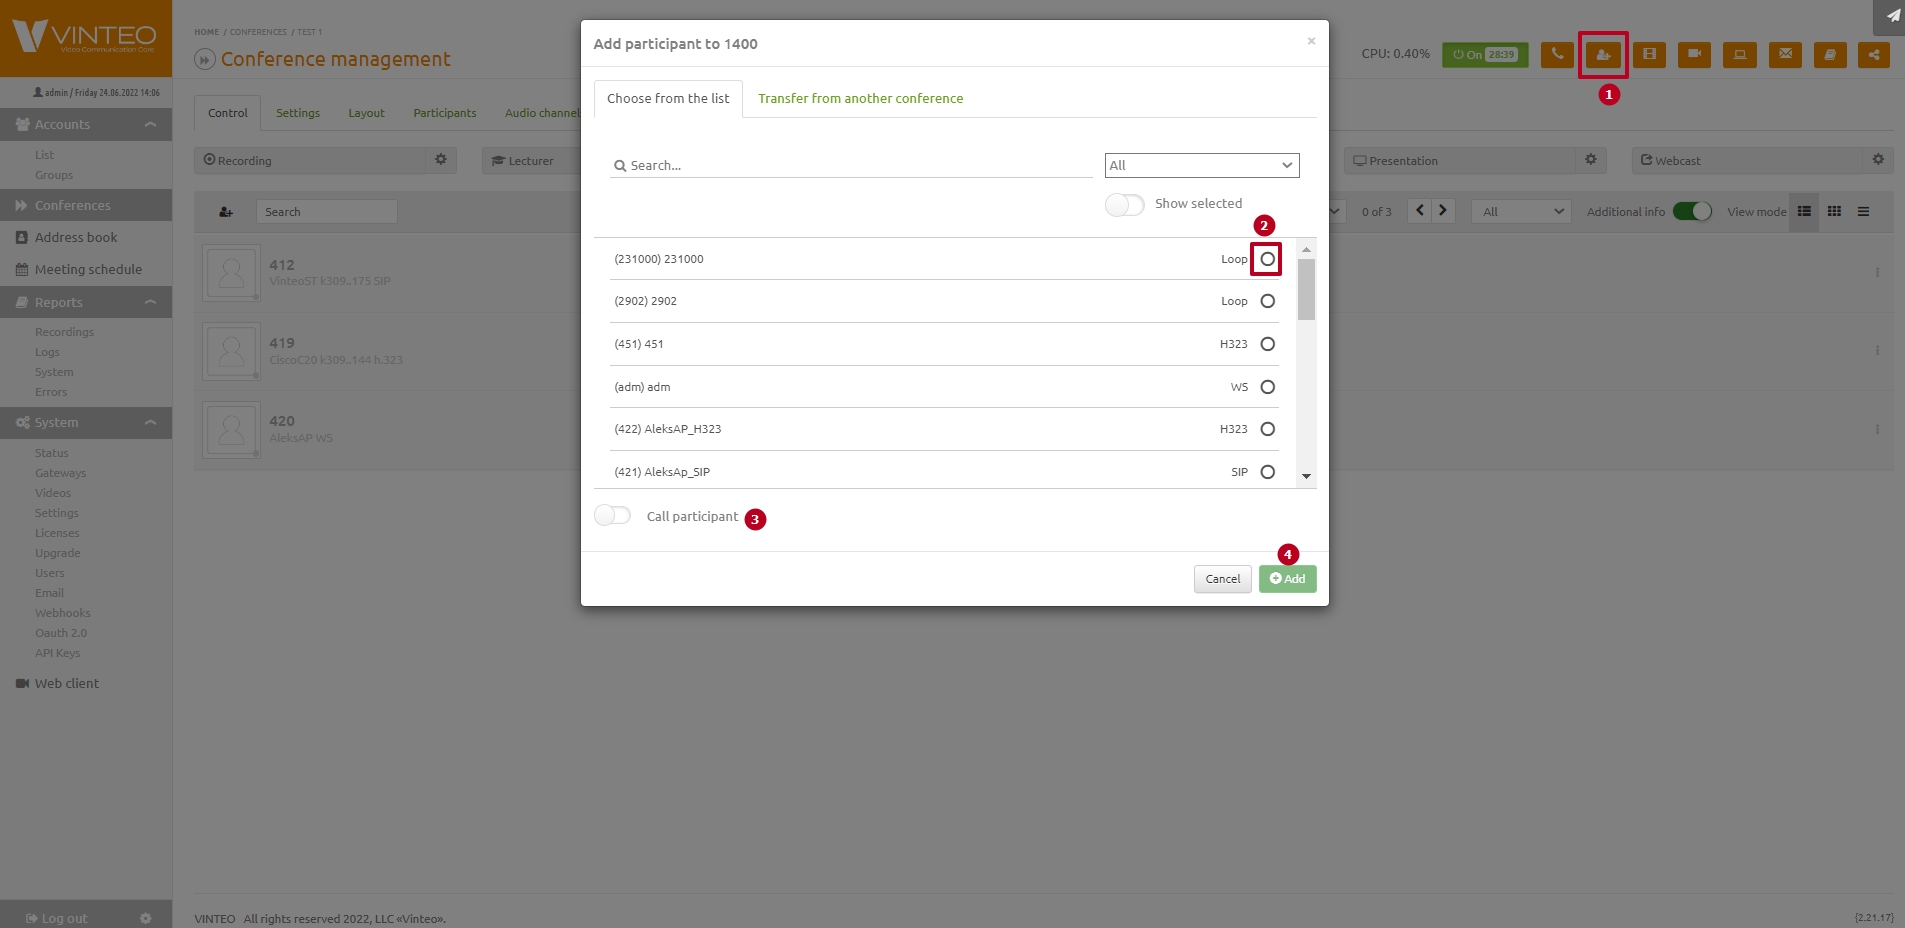
- Click “Add new account”;
- In the modal window, select registered accounts “100” and “101”;
- Enable the “Call participant” option;
- Click “Add”.
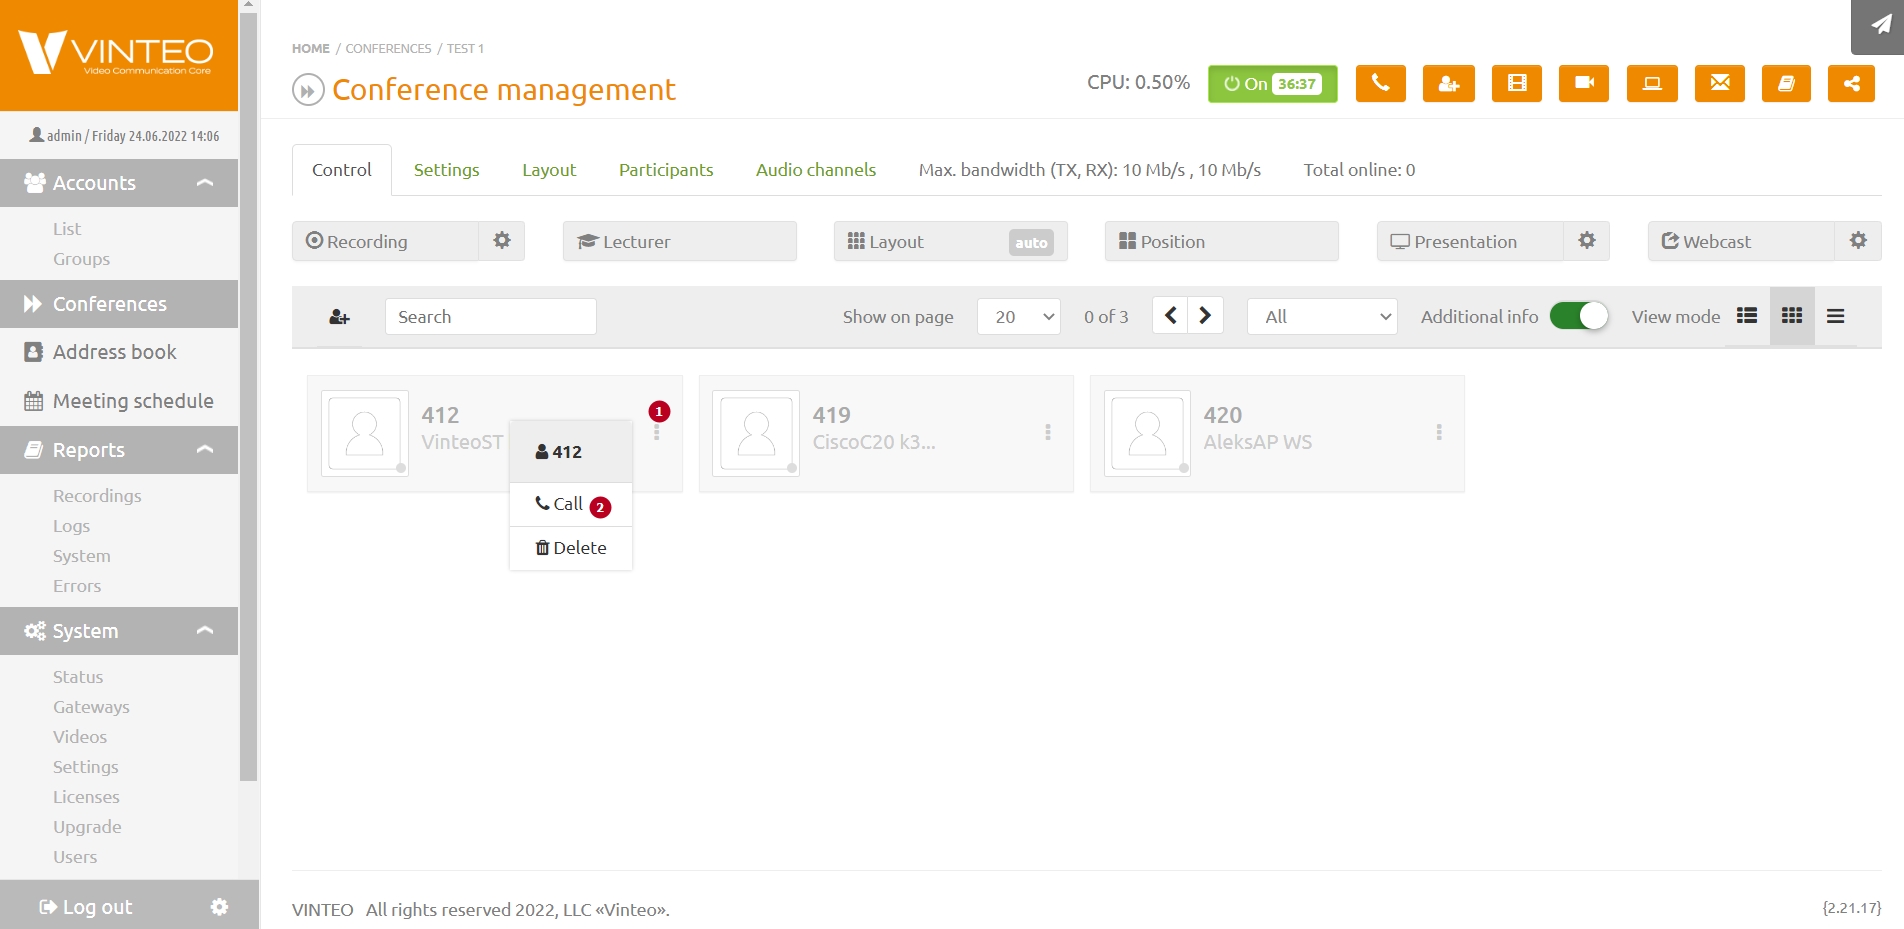
Since the “Call participant” option is enabled, after clicking “Add” they will be added to the invited list and immediately called to the conference. If this option is not enabled, you will need to call them one by one from the invited list using the participant control functions:
- open the participant control panel;
- call the participant.
Enable “Lecturer” mode, as it is disabled by default, and otherwise participants will see all speakers in the layout, including themselves.
Adding callers who are not on the invited list
If authorized accounts call into a closed conference but are not in the invited list, you must be on the “Conference control” page, on the “Control” tab. Then:
- open the pop-up window in the upper-right corner;
- click the account icon;
- confirm adding the account to the conference;
Working with accounts’ audio channel
To quickly mute an account’s microphone, double-click on them with the left mouse button. The inner area of the account’s tile will turn black.
Working with layouts
The common layouts for conference participants are managed on the “Layout” tab. This page allows you to configure the overall conference mosaic, choose the desired layout, arrange participants on the screen, define system positions for the lecturer or for participant rotation, etc.
“Auto” mode selects layouts from both layout types below depending on how many participants are in the conference.
“Auto equal” mode is the first layout type, which divides the overall screen into equal-sized panels displaying conference participants. The number of panels depends on the total number of participants. In this type of layouts, with default settings, participants taking the role of lecturer remain in their positions as long as the number of participants does not exceed the layout capacity. “Auto focus” mode is the second layout type, which allows participants to see the active speaker in a larger panel compared to others, automatically selecting layouts based on the number of participants. By default, “Auto” mode is enabled and uses both layout types as the conference fills up.
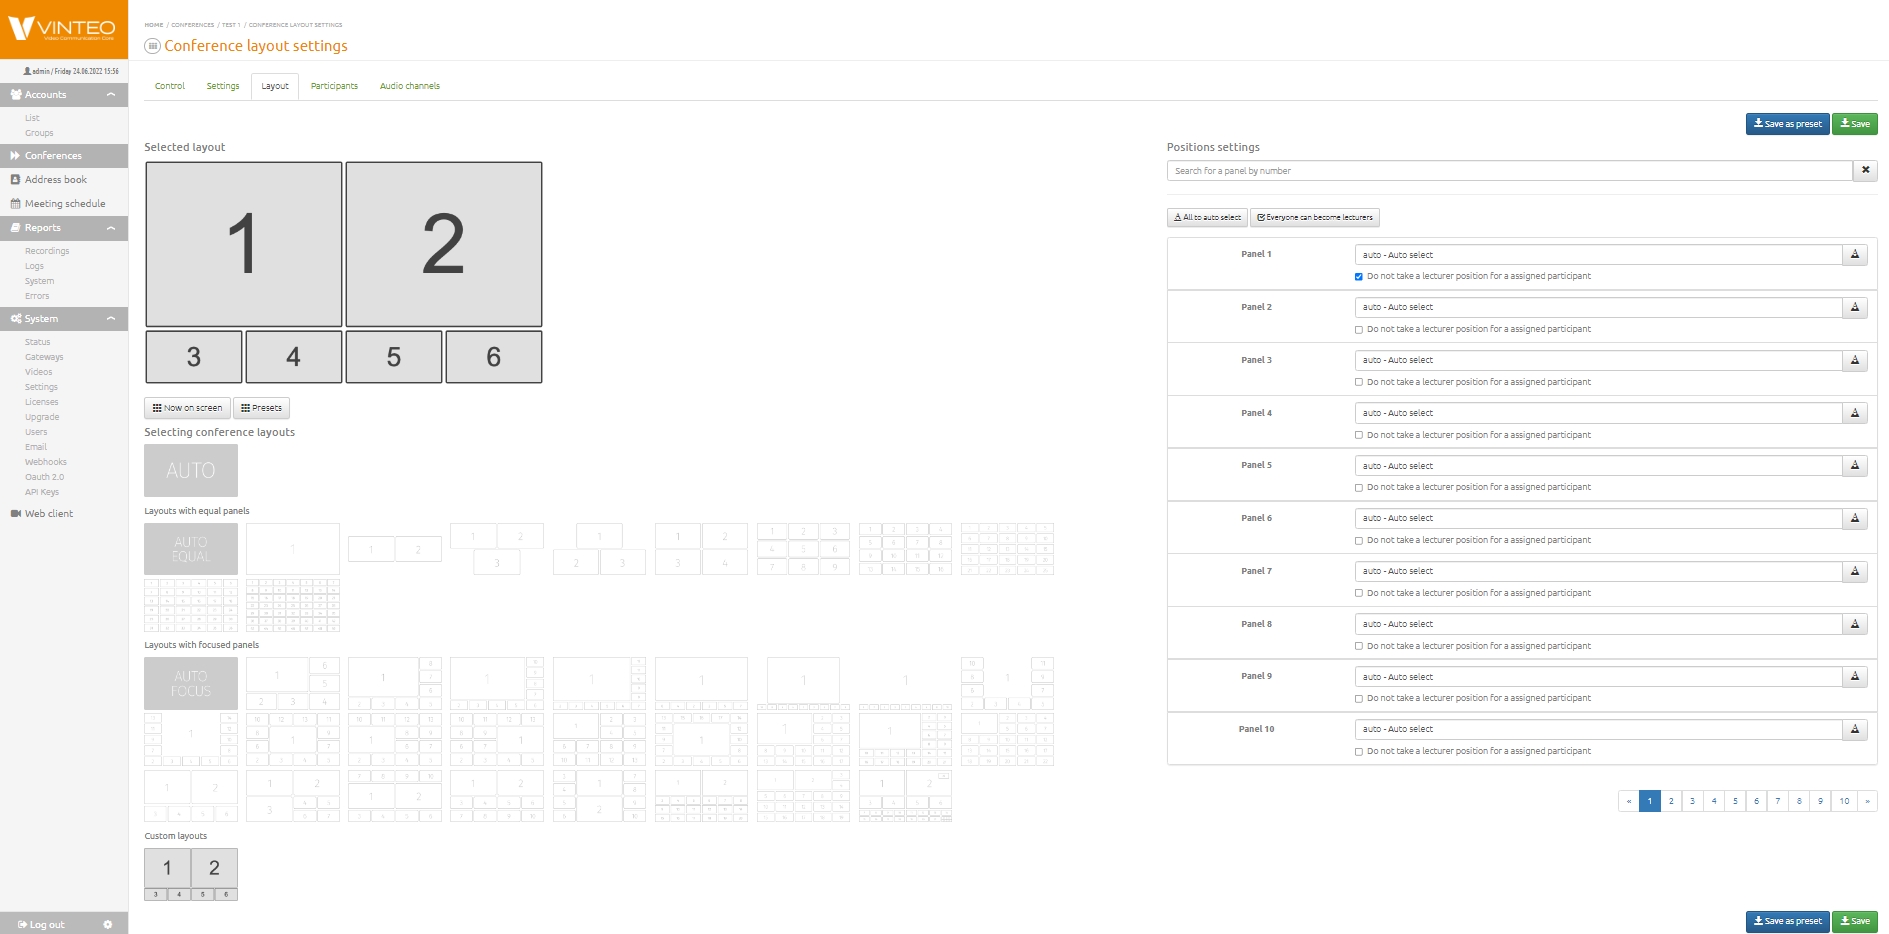
The “Layouts” page shows the selected mosaic in the upper-left area; layout templates are available for selection below. On the right side of the page you will find panel assignment controls, a button to set all positions to auto, and a panel search field.
To assign a value to a panel, place the cursor in the corresponding panel field. A list of available values and participants will appear, with connected participants highlighted in green and sorted for convenience. The input field in a panel includes a search function that filters the list to only those values that partially or fully match the entered text. The search works by participant number, participant name, or IP address. After selecting a layout or assigning panel values, click “Save” to apply the changes.
Checking anonymous conferences
When the “Create anonymous rooms” function is enabled, proceed as follows:
- dial any conference number from the software endpoint of the first subscriber, for example “4000”. A connection to anonymous conference 4000 will be established;
- perform the same actions from the second endpoint, as well as from any other endpoints required for testing.
All subscribers who dial “4000” will join the conference with the same number, which was created by the first subscriber. Moderation and web streaming of anonymous conferences are not available.
Checking “Group calls”
“Group calls” are available only to authorized WS-type subscribers with the appropriate permission, via the Vinteo Desktop application.
- add subscribers with numbers 101 and 102, created on the server, to the VD address book;
- in the sidebar navigator, select the dial pad icon;
- click “Group call”;
- mark with checkboxes the accounts created in step 1. Accounts ready to be called are marked with a green dot;
- click “Call”;
- the server will create a temporary conference (marked with a clock icon in the “Type” column) with a free number selected from the pool of conference numbers and invite the selected participants;
- the initiator of this conference has moderator rights and will see the participant control panel in the VD application. In addition to the basic controls, the moderator can assign or transfer moderation rights to other participants;
- the last moderator to hang up ends the conference.
Configuring the Vinteo mobile client
The Vinteo mobile application for smartphones and tablets is available in the AppStore and Play Market. After installation, configure it as follows. The “Calls” page is the home screen of the application. Call history entries will be displayed here.
Launch the application and open the settings.
Pay attention to two items: “Display name settings” and “Server settings”.
Edit your profile data and save by clicking “Done”.
Configure the server settings and save by clicking “Done”.
Check the “Status” and return to the “Calls” page (phone icon).
On the “Calls” page, click the dial pad icon.
Enter the conference number 1000 or subscriber 100 and press the call button.
After the # symbol comes the conference PIN code, if the conference is closed.
Accept the prompt to allow access to audio.
Accept the prompt to allow access to video.
By default, the participant’s microphone and video are disabled.
Enable the microphone and video and check incoming/outgoing audio and video.
End the call.
Configuring the RealPresence Mobile client
Next we will configure the “Polycom” mobile client, available in the Play Market and AppStore under the name RealPresence Mobile. The screenshots below show Android OS. After installing the application on your smartphone, proceed with its configuration.
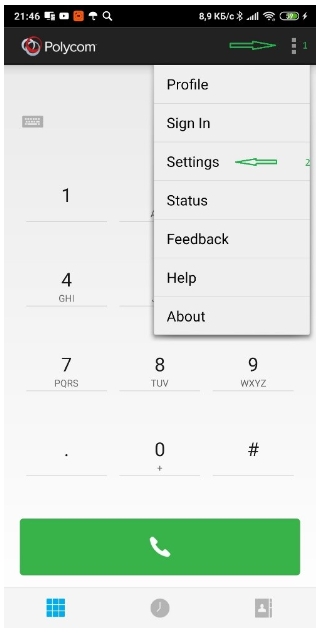
- Open the function list;
- select “Settings”;
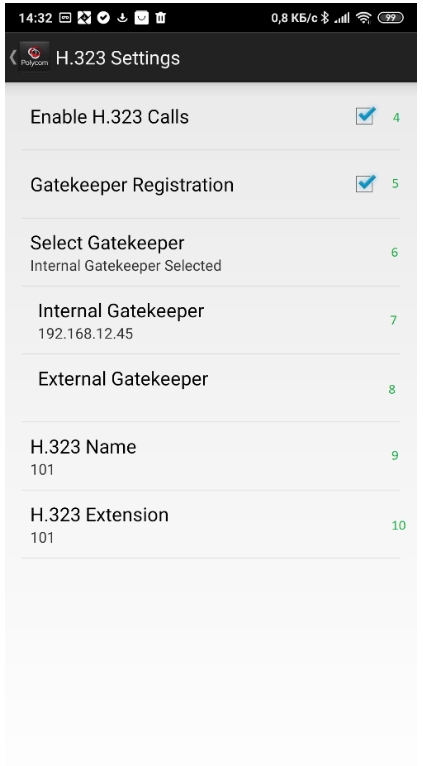
- select “H.323 settings”;
- enable H.323 calls;
- enable gatekeeper registration;
- here you can choose between the internal and external GK IP address, provided that the server has a second interface with access to the external network. The addresses are entered below;
- internal GK server address;
- external GK server address;
- enter the subscriber number;
- enter the same number again.
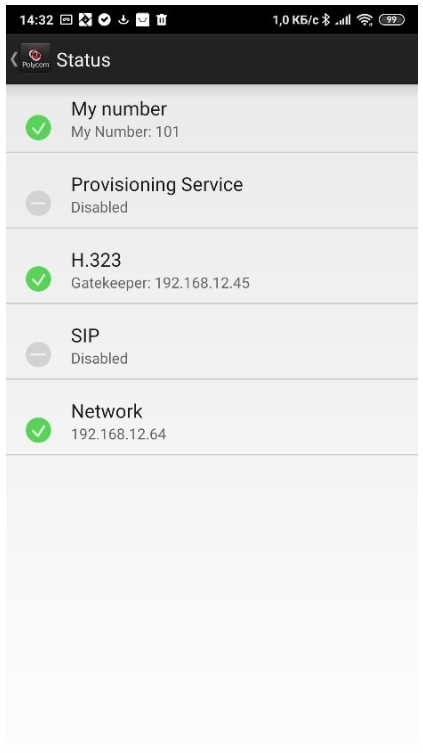
This is how the “Status” page should look for a subscriber registered on the H.323 GK.