

Scheduling Logic Overview
VINTEO provides the ability to schedule conferences. Scheduled conferences are displayed on the “Schedule” page, which is available in the main navigation menu. All registered server users can view a four-week calendar on this page.
The purpose of scheduling is that a conference will start at a specified time and, if enabled in the settings, participants will be called automatically. After the conference ends (after the scheduled duration has passed), the conference will stop and be removed.
You can schedule either a new conference (which will be created during scheduling) or an existing conference that has an expiration date. In addition to creating new conferences, administrators can schedule any existing conference with an expiration date and assign moderators. When scheduling a conference, a user can create a new conference or choose an existing conference from the dropdown list where they are assigned as moderator.
After scheduling, the conference appears in the conference list, where you can configure parameters such as broadcasting and recording. Administrators can edit all scheduled conferences. Subscribers can only edit those where they are moderators — either conferences they scheduled as “New Conferences” (where they are automatically assigned as moderator) or conferences where they were assigned by the administrator or other moderators.
Scheduling Conferences
To schedule a conference, follow these steps:

- In the main configuration menu, select “Schedule” — the “Conference Schedule” page will open;
- Click “Schedule Conference” in the top-right corner;
- In the modal window, configure the following parameters:
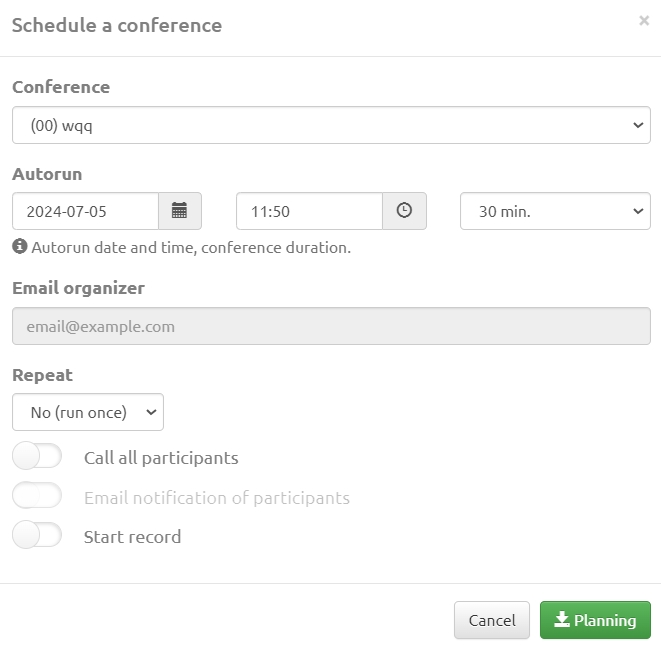
Conference” – dropdown field for selecting the conference that will start at the specified date and time.
A conference with the “Do not stop conference” setting enabled cannot be scheduled.
Autostart” – fields with a calendar, start time, and conference duration.
Organizer Email” – field for entering the organizer’s email address to send a notification.
Repeat” – dropdown list to select whether the conference should repeat and at what interval.
To create recurring conferences, the user must be assigned a “permanent conference” for moderation by the administrator. Conferences created by users via the schedule are “temporary, and cannot be used for recurring scheduling.
“Call all participants” – switch to automatically call all conference participants at the scheduled time;
“Notify participants by email” – switch to send notifications to all participants about the scheduled conference. The email will include the conference number, scheduled time, and connection methods. Notifications are sent to all conference subscribers with an email address specified. When enabled, an additional field appears for entering extra email addresses if needed.

“Enable recording” – switch that activates automatic conference recording.
Attention! A conference recording will be available to the moderator only until the scheduled one-time conference ends or until the last conference in a recurring series ends. This is due to the conference number being released after the scheduled event ends. The moderator must download recordings before the reservation expires. After that, they can request the recordings from the server administrator by specifying the time period or the names of the completed conferences. Administrators can avoid this inconvenience by creating a permanent conference and assigning it to the user for moderation.
- Click “Schedule” to confirm the settings.
Editing Scheduled Conferences
To edit scheduled conferences:
* In the main configuration menu, select “Schedule” — the “Conference Schedule” page will open;
* Go to the “List” tab;
* Click the “Edit” icon in the “Actions” column;
* The scheduling edit window will open, where you can change the scheduling parameters.
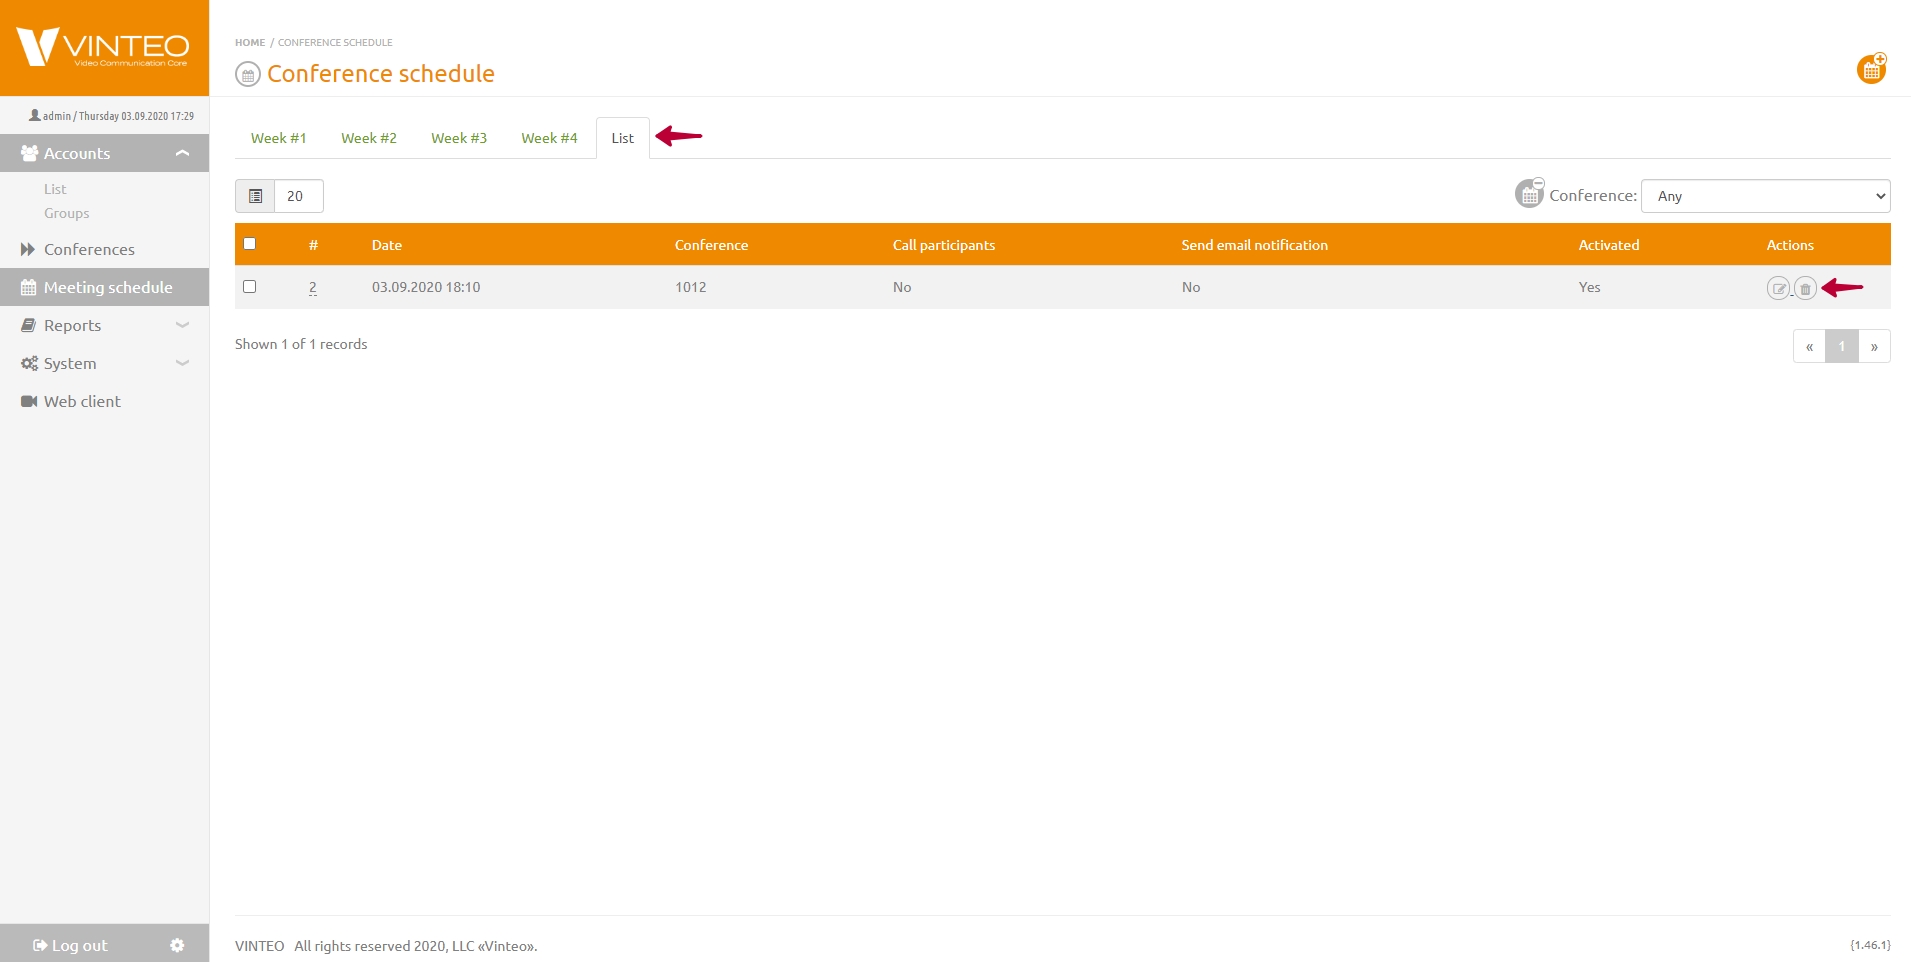
Note that the “Active” switch is enabled, indicating that this conference is scheduled.
The status is also shown in the “Activated” column in the “List” tab.
Deleting Scheduled Conferences
To delete a scheduled conference:
- In the main configuration menu, select “Schedule” — the “Conference Schedule” page will open;
- Go to the “List” tab;

- Click the “Trash” icon in the “Actions” column, or select multiple conferences using the checkboxes;
- Click “Confirm” to delete the selected schedules.
Moderators can see all scheduled conferences in the calendar on the “Schedule” page, but in the “List” tab they only see their own conferences, which they can edit and delete.
Viewing Scheduled Conferences
To view scheduled conferences:
- In the main configuration menu, select “Schedule” — the “Schedule” page will open;
- Go to one of the four weekly tabs;
- Find the desired conference.
The “List” tab allows filtering by conference number.
Only future conferences are displayed in the “Schedule” and “List” views. Conferences that have already started remain only in the “Conferences” section.